
So, you’re planning to create a video. How to get started though? Of course, you could turn to a professional video production team, but it depends on how much money you are planning to spend on your project.
There’s always a more cost-effective way to do things. In this case, to produce a video.
What type of video do you want to create? First, choose the type: educational videos, promos, product explainers, informational videos, documentaries, entertainment videos, corporate videos, film and TV production, event videos, etc.
Then, go through the video production process that consists of 3 phases. Even if it’s a short 1-minute video for Instagram Reels, you need to follow all the steps for a successful video outcome.
Let’s go through this process and discover all the necessary steps you should take. So, what are the 3 stages of video production?
The 3 phases of video production are:
- Pre-production
- Production
- Post-production
Pre-production
The pre-production phase is the planning process when you decide on your video objectives and goals, budget, equipment, story, timeline, and prepare for the production phase.
Without proper planning, your video production process will fail. So, you need to consider all the important factors beforehand.
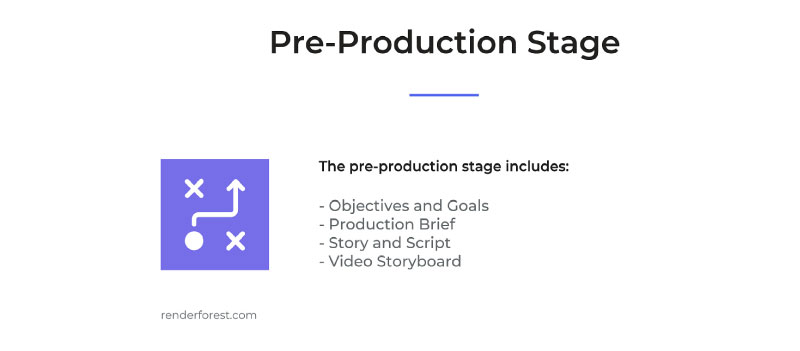
Objectives and Goals
Videos are one of the most effective ways to engage your audience. But if you don’t set goals and objectives, you can’t measure the success of your project.
You might have heard about setting SMART goals. The term stands for Specific, Measurable, Achievable, Relevant, and Time-Bound. This is how your goal should be.

Set specific goals: What do you want to achieve with your video?
Set measurable goals: Identify the metrics that will measure your success.
Set achievable goals: Practical goals will help you motivate and inspire your team.
Set relevant goals: Make sure your project is relevant to your audience.
Set time-bound goals: Pay attention to your deadlines.
Production Brief
What is needed for video production? Your brief answers this question in detail. It’s a document with a summary of all the necessary information to keep the production running. Your brief covers the goals and objectives, budget, timeline and deadlines, people involved in the process, and other important details.

Here, calculating the budget plays an important part. You should make sure that your expectations are realistic to your budget at hand. For example, the average professional video production cost is around $1,000 – 5,000 per minute.
Is it something you can manage? Or, should you find budget-friendly options? For example, you can cut your expenses by using online video editing tools, instead of hiring a professional editor.
Select your equipment and include it in your brief. Whether it’s professional video equipment or a simple smartphone, you need to prepare it beforehand.
Your brief should also include the actors if it’s a live-action video, motion graphic artists and illustrators if it’s an animated video, people who take part in the project and their responsibilities, and a plan B in case someone doesn’t show up, or something goes wrong.
Story and Script
Whether it’s a short Instagram post video, or a 15-minute YouTube video, you need to have a story. Introduce your core message and tell your story through your video script.
Since you already have your goals and know your audience, you need to choose a story that resonates with them. Based on the type of video you have in mind, first, underline your main message and then build your story around it.
Choose a central character for your story. It can be you, or a character based on your ideal buyer persona. Then, write your script by implying your main message. If you intend to create many videos, it would be ideal to keep your characters consistent throughout the series. This will create an emotional connection between them and your audience.
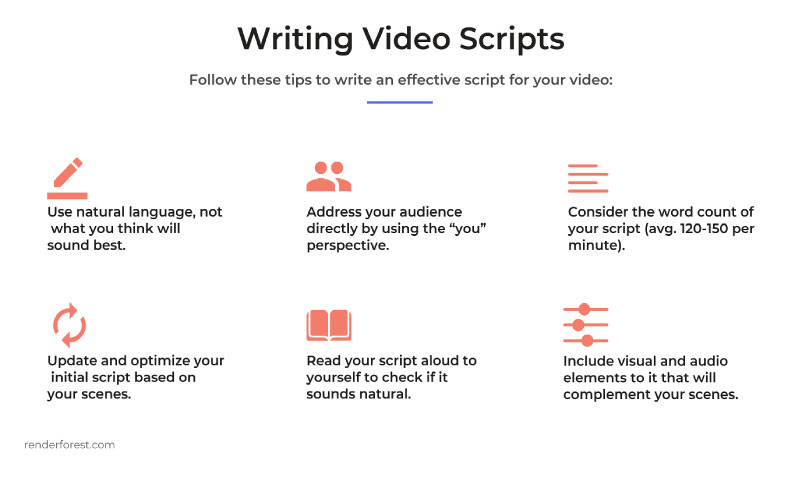
While writing your script, pay attention to the following tips:
- Write as you (or your character) would speak. Use natural language, not what you think will sound best.
- Consider the word count of your script. The average number of words per minute is 120-150.
- Don’t stick to your initial script. Update and optimize it based on your scenes as needed.
- Address your audience directly by using the “you” perspective.
- Read your script aloud to yourself to check if it sounds natural.
- Include visual and audio elements to it that will complement your scenes.
Video Storyboard
Once your script is ready, go ahead and visualize it with a storyboard. “What is a storyboard?”, you would ask. It’s a set of visuals that represent the individual shots planned for a video. This will help you a lot during the production process because you will have all the things you need while shooting or creating your video scenes.

What to include in a storyboard?
- Frame – enumerate your shots and add relevant images, or visuals to have a clear idea of what that shot will look like.
- Action – describe the action happening in that shot.
- Script – write the script/voiceover for that specific scene.
- Effects or additional information – add your comments on the sound effects, details about the shot, special effects, etc.
To make your storyboard or timeline, you can find a suitable storyboarding tool.
Now that the preparation and planning process has been finalized, you can begin the production stage. Remember that the best you do your “homework”, the smoother your production process will be. Take into account all the possible things that can go wrong and hinder your video production.
Plan everything beforehand and get ready.
Lights, camera, action!
Recommended Reading
Production
Let’s move to the second phase of video production. This phase gives life to your video concept after your hard work and preparation.
What is video production in simple words? It’s the filming process (or the process of making animations) based on your storyboard, when you prepare all the footage, voice-overs, and other materials necessary to complete your project.
To successfully complete this phase, you can make a checklist and follow the steps. This way you won’t miss any important things. Besides, you will need someone as a director for the whole process. If it’s a small team, you can act as a director yourself, or you can hire someone if your budget allows you to do it.
So, what can be included in the production process?
- Setting up your equipment and the filming location/room.
- Rehearsing for a better filming experience.
- Filming the A-roll footage (the main footage used for your video).
- Preparing the b-roll footage (stock videos to support your video, or behind-the-scenes footage).
- Recording the voice-overs.
- Conducting the interviews (if necessary).
- Creating animations (if necessary).
- Preparing the graphics and other materials needed.
- Saving the filmed footage and the created materials (we don’t want any emergencies, right?)
If you are your own production team, then you’ll have to go through these steps all alone. If you’re used to acting on camera, it’s a great advantage for you. If not, you’ll need to master your acting skills. Or, learn how to record a voice-over, if you don’t hire a professional voice-over artist.
The same goes for creating animations. Online animation tools can be a great alternative to hiring freelancers if you are on a budget.
Once you prepare all the necessary materials, you can move further into the post-production phase.
Recommended Reading
Post-production
And, the final stage is post-production – when all the magic happens. All the hard work during the first two stages, planning, and filming led to this moment. Now, it’s time to turn the raw materials into the final video.
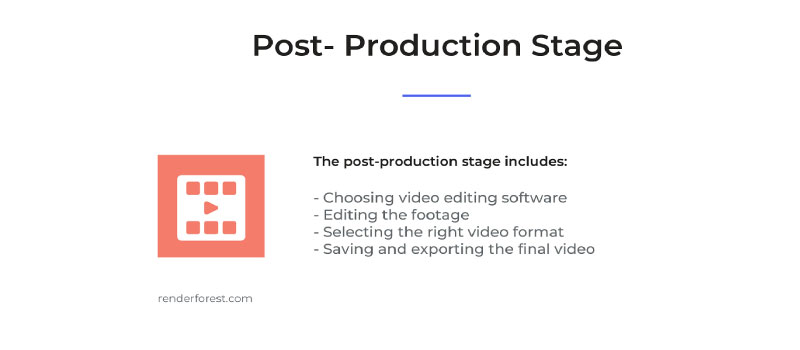
How to get started? Here are the basic steps of the post-production process:
- First, choose how you want to edit your video
Depending on the complexity of your project, you can choose between hiring a professional video editor, or using video editing software, if you’re familiar with any of them. Another option is using an online video editing tool if you don’t have any video editing skills. You can find both free and paid versions. Choose the one that works best for you and has all the features you need.
- Compile all your footage and materials together
Once you choose the editing software, it’s time to get the editing done!
Prepare your raw footage by using all the necessary tools like cropping, trimming, rotating, flipping, cutting, etc. Then, put them in the timeline and connect to each other through transitions, add text/captions, enhance them through sound effects, add or remove the footage sounds where needed, and add some background music.
This is a very brief introduction to the process. It takes a lot of skills and patience to do all the above-mentioned things. If you’re not a professional editor, then this process might take a bit longer with editing software and the result is unknown. That’s when online video editing tools help to put them all together with their advanced tools and user-friendly platforms.

- Finalize and export your video
When you finish editing your video, choose the right video format and export it. This will be considered your first draft, and all the stakeholders should review it and suggest changes if needed.
Once all the comments and changes are done, your video is ready for the final export.
This was the post-production process. After this process, you can distribute your video and analyze the results. Depending on where you publish your video, you can check the analytics, measure the results based on the metrics and goals you’ve set during the pre-production phase. Then, evaluate the results, and draw your conclusions for the upcoming video projects.
Conclusion
This was the video production process in a nutshell. No matter what kind of video project you intend to create, you need to go through all the 3 stages: pre-production, production, and post-production.
It’s up to you to decide whether you’ll go through this process with a big video editing team, or all by yourself. In any case, the results depend on how well you plan, implement, and analyze your project.
If you’re making your first steps in video editing, you can begin with online video editing tools and customizable templates. Renderforest offers a wide range of templates perfect for YouTube and social media videos, animations, Stories, and more. Pick a template, upload your footage, edit, and export in a very short period of time. Sign up and try them today! parasprunki 15.0 Fast, fun, and totally addictive
Can you be more specific about the content of your article? After reading it, I still have some doubts. Hope you can help me.
Your point of view caught my eye and was very interesting. Thanks. I have a question for you.
Can you be more specific about the content of your article? After reading it, I still have some doubts. Hope you can help me.
Very interesting points you have noted, regards for posting.Raise blog range
Your article helped me a lot, is there any more related content? Thanks!
Thanks for sharing. I read many of your blog posts, cool, your blog is very good.
Your article helped me a lot, is there any more related content? Thanks!
I don’t think the title of your article matches the content lol. Just kidding, mainly because I had some doubts after reading the article. https://accounts.binance.com/en-NG/register?ref=JHQQKNKN
Your point of view caught my eye and was very interesting. Thanks. I have a question for you.
Thank you for your sharing. I am worried that I lack creative ideas. It is your article that makes me full of hope. Thank you. But, I have a question, can you help me?
Your point of view caught my eye and was very interesting. Thanks. I have a question for you.
Your article helped me a lot, is there any more related content? Thanks!
Can you be more specific about the content of your article? After reading it, I still have some doubts. Hope you can help me. https://www.binance.com/register?ref=P9L9FQKY
Your article helped me a lot, is there any more related content? Thanks!
Thanks for sharing. I read many of your blog posts, cool, your blog is very good.
Thank you for your sharing. I am worried that I lack creative ideas. It is your article that makes me full of hope. Thank you. But, I have a question, can you help me?
Thank you for your sharing. I am worried that I lack creative ideas. It is your article that makes me full of hope. Thank you. But, I have a question, can you help me?
Your point of view caught my eye and was very interesting. Thanks. I have a question for you.
Your point of view caught my eye and was very interesting. Thanks. I have a question for you.